Allowing managers to curate personality based groups

Personal project case study

ROLE
As-is mapping
User personas
How might we mapping
MoSCoW prioritization
Wireframing
Prototyping
TEAM
Me!
DURATION
December 2020

Problem

How can we improve the efficiency of work, and collaboration between members of a team to ensure optimal output of tasks and the completion of the team’s purpose while maintaining team relations?

Solution

By gathering information regarding each member to assign them to tasks which play to their strengths/interests, and providing the team with a methodology to follow which removes a strict order of project phases, but instead focuses on constantly evolving processes through rapid iteration.

BACKGROUND

Working through a semester of online school, like many others I found efficiency in teams to be difficult to arrange, especially working in different time zones on multiple parts of a project. It becomes difficult to get to know those you are working with, and successfully be able to understand each member’s strengths and weaknesses.
In order to develop a system which brings out the best in each team member allowing for the best working experience, I researched the concepts of Tuckman’s Stages of Development, Myers-Briggs Type Indicator Test, and Agile concepts and frameworks and analyzed how to implement them into a team management application. While Tuckman focused on creating an empathy map to understand the mentality of the group, the MBTI focused on understanding the user, and Agile concepts focused on improving the processes.

Understanding the problem

HOW MIGHT WE MAP

Before closing in on one idea or feature, I thought of any and all problems which could possibly be addressed during the process. In order to do this, I created a How Might We Board (click here to view) where I listed every single possible problem which could be addressed. The main theme I was brainstorming under was team management. During this process I brainstormed all the ideas I could think of, instead of focusing on the feasibility, or work required- I simply looked at “what are some problems”, and phrased them as a question which could be solved.
Some of the questions I considered when coming up with the How Might We were:

AFFINITY MAPPING

After having a jumble of ideas all together, I put them in different groups. By doing this I planned out clear concepts I wanted to address in the objective of the application, creating the Affinity Map.
This allowed me to remove any redundancies and determine which concepts came up multiple times, as well as the depth of each group.
Affinity mapping with 7 main subgroups
THIS HELPED ME DEVELOP THE FOLLOWING DESIGN STATEMENT

"How can we improve the efficiency of work, and collaboration between members of a team to ensure optimal output of tasks and the completion of the team’s purpose while maintaining team relations?"

Understanding the user

PRODUCT JOURNEY

To consider how each part of the objective met with the needs of each potential user of the project, I created five different roles, for whom this project was directed at. These five roles have different responsibilities in any team, and will be completing different actions at each part of the project cycle.
The product journey map assesses how each user would interact with the project and if their need for using it is met.
User flow outlining the five key characters that could use this application

USER PERSONAS

In order to make this more broadly applicable for general users of the application, I created two user personas- one of a busy businessperson, and another of an overwhelmed student. This allowed for two use cases to be explored: one where the likelihood of having one person for each role is high, and another where it is likely that one person has to take on multiple roles in the group/organization. Through this I was able to determine how to make the product scalable.
Guy Hawkins, the Busy Businessperson is the first person- their motivation is to communicate clearly and keep everyone on the same page. Their main pain point is the amount of time they spend on daily checkins for all their projects.
Jenny Wilson, the Overwhelmed Student is the second person- their motivation is to manage all of their extracurriculars, and understand how to work with their team members. Their main pain point is now knowing how far their team is on in the project progress.

SYSTEM REQUIREMENTS MAPPING

The last part of the ideation stage was gathering all the information to list out the system requirements (click here to view) in the project. Doing this is extremely important as it helps to understand the importance of each function, how it works, and what it does to improve the user experience.
The features marked as ‘High’ priority are those which directly connect to the objective of the platform. These contribute towards solving the immediate root of the problem, and are essential for success. Those marked as ‘Medium’ and ‘Low’ respectively are add-ons, and can be used as additions if resources are available. While not required for the success of the platform, it adds extra features which could be helpful in avoiding future problems.

Ideation

WIREFRAMES

After deciding what features are to be included in the platform, I created a low fidelity wireframe which illustrated the basics of each major screen that was going to be present.
I used colours to highlight the relationships between different screens, and indicated my flow of thought
From the low-fidelity model I separated the actions the user could take into three groups, which would be decided at the login button. They could either create a profile, create a team, or sign in. While these screens have the potential of leading to each other, separating them allows for easier grouping of ideas.

SITEMAPPING

In order to break down the attributes of each group and what commands the system would have to provide to the user for ease of use, I created a sitemap with an overview of all pages (blue), actions required (red), and system commands (green).
Doing this allows for a clear outline of every page in the application and how it causes further actions down the line, creating the information architecture of the application.
Sitemap used for the information architecture breakdown of the website

MEDIUM FIDELITY MOCKUPS

In the medium fidelity mockup I specified what components would be in which page, the input fields required, and the overall action items which would be present on each screen. This laid a basis for the prototype as it provides a basic understanding of the resources which need to be allocated towards each section, as well as advises the flow of the entire system.
It is important to ensure intuitiveness for the user, and the mockup presents a check for this. While there are not any images or colour present, the overall ideas remain the same.
Medium fidelity mockups of the main screens used to illustrate the user flow

TYPOGRAPHY

Prior to prototyping, the last aspect which needed to be considered was the typography, and fonts for the application itself. Since the focus group was for any type of team, the colour scheme would have to remain traditionally professional, leaning towards darker colours. However, since the theme was surrounding wolves and packs, I focused on purples and dark blues with light pink used for accentuating important information.
The fonts used were Open Sans, Montserrat, PT Sans and Source Sans Pro in various sizes and highlights. The Serif fonts lent themselves to the professional theme throughout, and the use of Montserrat as a geometric sans typeface was used for titles and headings.

MANAGE MEMBERS

Team members are able to view others’ profiles, their current roles and their information (strengths, personality type, interests). Team managers will use this area to add or remove team members, as well as reassign them to a different team.
Screenshot of the manage members screen
Screenshot of the update sprint information screen

UPDATE SPRINT INFORMATION

Members are able to schedule meetings, add tasks to sprint, update sprint status with comments, and move items from the backlog to the burndown- allowing for member autonomy. These can only be done in sprints that they have been assigned to. Team leaders set the initial values for each sprint upon creation of the team and subteams.

EDIT PROFILE

Users are able to control the information shown on their own profile, as well as modify their interests and skills as they change. This area also leads to the Calendar where they can input their working hours, and also view the roles they are presently assigned to.
Screenshot of the edit profile screen
Screenshot of the manage sprint screen

MANAGE SPRINT

Team leaders are able to get an immediate understanding of the project, an overview of its health and any key information that needs to be addressed. They can choose to select meetings, tasks, health, or project information to edit it or view more information. Leaders can also send announcements to sub-teams/general teams.

VIEW PERSONALITY TYPE

The ‘Results’ screen shows the user an overview of their individual results to the MBTI test, as well as the accompanying characteristics, and a small description. Members can chose to have these results displayed or hidden from their profile.
Screenshot of the view personality type screen
Screenshot of the project overview screen

PROJECT OVERVIEW

All team members are able to get an overview of all deliverables in the project, the product backlog, what sprints are present and other information regarding the team. This helps keep everyone on the same page regarding any changes and allows for optimal collaboration.

CALENDAR

In order to allow members to use HOWL to work across various teams, the Calendar option allows them to specify working hours for each team as well as input any events they may have. These events can be recurring or one-time.
Screenshot of the calendar screen
Screenshot of the chats and announcements screen

CHATS AND ANNOUNCEMENTS

Members are able to send messages to each others, view changes to their project through notifications, and receive announcements from their team lead.

What did I learn?

IMPLEMENTING DESIGN PRINCIPLES

In this project, one of the first things I set out was the principles the platform would be following: teamwork, professionalism, and efficiency. To accomplish this I used a variety of product management and product lifecycle principles, based on which I created the features the application has. When creating the cohesive flow of the system and the associated branding, I found it incredibly important to relate everything back to the core principles I had set out. Some examples of this were the colours chosen (dark tones for professional settings), the setup of different workspaces (efficient navigation between various teams, both personal and professional), and navigation between projects (allows for moving team members around, matching their individual strengths).

DESKTOP FUNCTIONALITY

This was the first project through which I explored desktop functionality, while I only anticipated that designing for a larger screen would mean more prominent buttons and calls-to-actions required, I found that the correct use of white space was equally as important. While I felt the need have information displayed throughout the screen, I found that doing this would only confuse the user. However presenting grouped information under less frequently displayed subheadings, using proper information architecture, was a better use of the space.
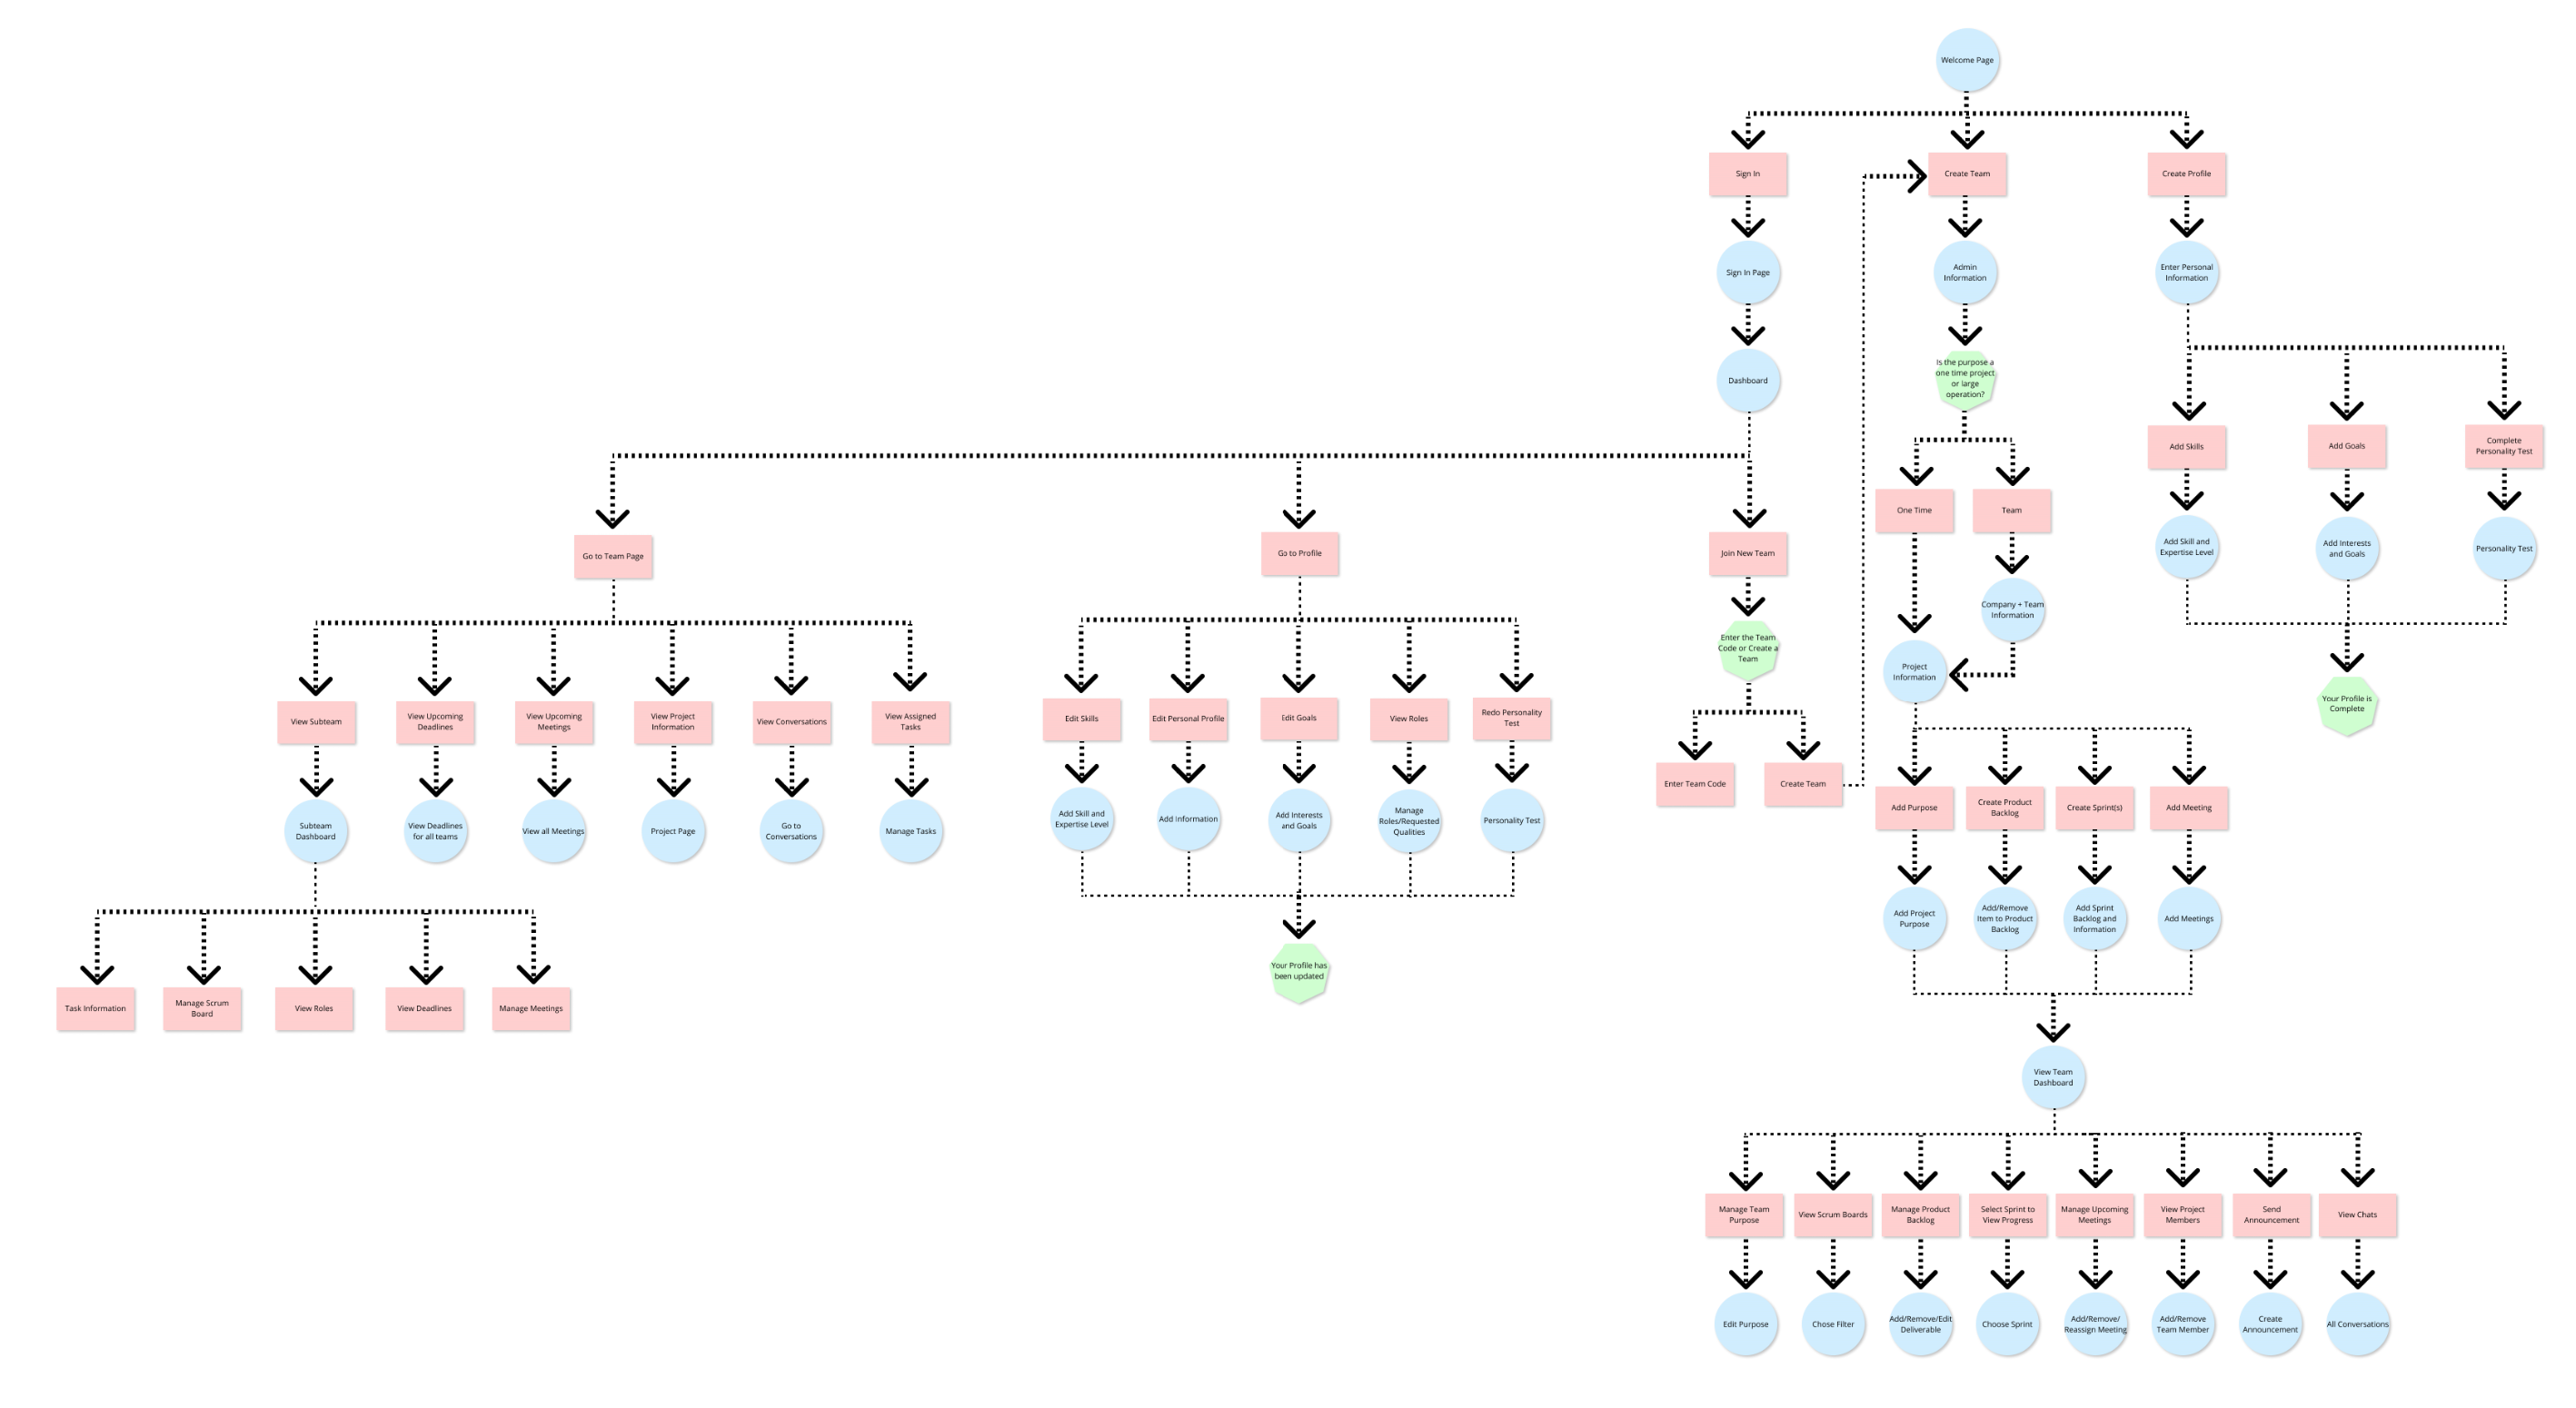
MVP DESIGNATION

During this project management application, I also had to manage the project (haha) by determining which of the ideated features would be available in the minimum viable product, versus which could be saved for future iterations. After developing the entire spread of ideas using 'How Might We' mapping and 'Affinity Mapping', I then went back to what was determined as the initial user needs and associated requirements to determine what should be included at the forefront.

For example, as a product manager, the user needs to be able to know the status of each task in the project, while they would like to be able to communicate between project teams from one location. Differentiating between each primary users needs and wants helped determine what should be included during the first version of the application.

MARKET ANALYSIS

Since this application was similar to other project management applications such as Slack and Monday.com, an important aspect of the ideation process was understanding what features they had that worked extremely well, and some places for improvement that could possibly be explored. I found some core concepts to be the ability to message co-workers, and set assignees for tasks. One area that most applications lacked was the humanization of the team members, where people would be able to develop their weaknesses and lend their strengths to each project. Focusing on the area of the market that was missing, and merging it with what worked well avoided completely reinventing the wheel, while having innovative ideas for increased team efficiency.